To find the number of CPU ,execute the below command
cat /proc/cpuinfo
Last command:
NAMElast, lastb - show listing of last logged in users
SYNOPSISlast [-R] [-num] [ -n num ] [-adiox] [ -f file ] [ -t YYYYMMDDHHMMSS ] [name...] [tty...] lastb [-R] [-num] [ -n num ] [ -f file ] [ -t YYYYMMDDHHMMSS ] [-adiox] [name...] [tty...]
DESCRIPTIONLast searches back through the file /var/log/wtmp (or the file designated by the -f flag) and displays a list of all users logged in (and out) since that file was created. Names of users and tty's can be given, in which case last will show only those entries matching the arguments. Names of ttys can be abbreviated, thus last 0 is the same as last tty0.
When last catches a SIGINT signal (generated by the interrupt key, usually control-C) or a SIGQUIT signal (generated by the quit key, usually control-\), last will show how far it has searched through the file; in the case of the SIGINT signal last will then terminate.
The pseudo user reboot logs in each time the system is rebooted. Thus last reboot will show a log of all reboots since the log file was created.
Lastb is the same as last, except that by default it shows a log of the file /var/log/btmp, which contains all the bad login attempts.
OPTIONS
-num
This is a count telling last how many lines to show.
-n num
The same.
-t YYYYMMDDHHMMSS
Display the state of logins as of the specified time. This is useful, e.g., to determine easily who was logged in at a particular time -- specify that time with -t and look for "still logged in".
-R
Suppresses the display of the hostname field.
-a
Display the hostname in the last column. Useful in combination with the next flag.
-d
For non-local logins, Linux stores not only the host name of the remote host but its IP number as well. This option translates the IP number back into a hostname.
-i
This option is like -d in that it displays the IP number of the remote host, but it displays the IP number in numbers-and-dots notation.
-o
Read an old-type wtmp file (written by linux-libc5 applications).
-x
Display the system shutdown entries and run level changes.
Thursday, December 22, 2011

Wednesday, December 14, 2011
Step by Step Installation and Configuration of Web Logic 12c

Step by Step Installation and Configuration of Web Logic Server 12c
Software
1. Download Weblogic Server from the following URL:
http://www.oracle.com/technology/software/products/middleware/htdocs/fmw_11_download.html
2. Review documentation to meet the basic hardware and software requirements:
http://download.oracle.com/docs/cd/E15523_01/doc.1111/e14142/toc.htm
Installation
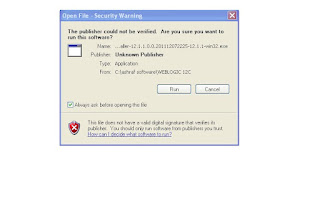
Invoke the installer ,click Run
Software
1. Download Weblogic Server from the following URL:
http://www.oracle.com/technology/software/products/middleware/htdocs/fmw_11_download.html
2. Review documentation to meet the basic hardware and software requirements:
http://download.oracle.com/docs/cd/E15523_01/doc.1111/e14142/toc.htm
Installation
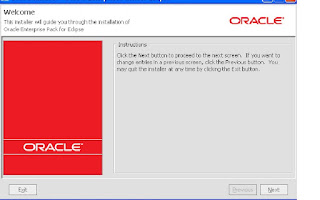
Invoke the installer ,click Run

Click Next
3. Enter the location for Middle Ware Home and click “Next”
4. Register for Security Updates if you wish to and click “Next”
5. Choose Install Type, I’ve chosen “Custom” and click “Next”
6. Choose “Products and Components” you wish to use and click “Next”
7. If you have previous JDK/JRockit SDK, you can choose to browse the path, although Oracle recommends that you download the latest JRockit SDK to use with WebLogic. You can download the latest JRockit from:http://www.oracle.com/technology/products/jrockit/index.html
This screen displays a list of JDKs. This list differs depending on the specific installer you are using. For example, .jar installers do not include SDKs. If you are upgrading from a previous version, the list contains JDKs that are available for (and common across) previous installations of all the selected WebLogic Server components.
Select the JDK or JDKs that you want to install with the product.
You can also browse for and select a local JDK (at least 1.6.0_05) installed on your machine.
This screen also displays the approximate installed size of the highlighted JDK, the total installed size of all the selected JDKs, and the total installed size of all the components.
8. Choose “Product Installation Directories” and click “Next”
9. Choose whether you want to install the Windows services indicated, specifically the Oracle WebLogic Server Node Manager service. Node Manager is used to monitor, start, and stop server instances in a WebLogic domain.
If you select Yes, enter the Node Manager Listen Port in the appropriate field. The default is 5556.
All Users Start menu folder
Select this option to provide all users registered on the machine with access to the installed software. However, only users with administrator privileges can create shortcuts in the All Users folder. Therefore, if a user without administrator privileges uses the Configuration Wizard to create WebLogic domains, Start menu shortcuts to the domains are not created. In this case, users can manually create shortcuts in their local Start menu folders, if desired. Press ALT+A on the keyboard to select the All Users Start Menu.
Local User's Start menu folder
Selecting this option ensures that other users registered on this machine do not have access to the Start menu entries for this installation. Press ALT+L on the keyboard to select the Local User's start menu.
11. Review the Installation Summary and click “Next”
Configuration
1. Now in the configuration wizard, we’ll choose “Create New WebLogic Domain” and click “Next”
2. Choose the defaults, I’ve also chosen “WebLogic Advanced Web Services Extension” from the following screen, click “Next” to proceed
Now enter the Domain Name and Enter the Domain Location, click “Next” to proceed
Configure the WebLogic Administrator and Password, click “Next” to proceed
5. As this is a basic install and for development purposes, I will choose the “Domain Startup Mode” as “Development. Careful consideration should be taken for production deployment. Click “Next” to proceed
6. Select the Optional Configuration , I’ve selected the following options(we can configure JMS at a later stage):
Configure the Admin Server :
8. Configure the Managed servers and click “Next”
9. Next screen asks you if you wish to configure cluster, I did not configure any cluster. Click “Next” to proceed.
10. Next Screen is Configure Machines, I’ve not configured any. Click ” Next” to proceed
11. Review the Configuration Summary and click “Create”
12. Start the Admin server Click “Done” to finish and close the quickstart screen.
13. Now that we have installed and configured the WebLogic server, lets start the WebLogic server for the domain we configured. If Admin server is not started during the installation ,the startup scripts are placed in the user_projects directory for the domain we configured.
D:\oracle\product\weblogic12c\user_projects\domains\base_domain
Startweblogic.cmd
14. Now that the WebLogic Server is started lets login to the console
1. In to order login to the console open the web browser , the URL will be of the following format:
http://.:7001/console
In my case it will be
http://ashraf-oracle:7004/console/
The user name is “weblogic” and the password is what you configured during the configuration.
You will be presented with a neat front page, navigate to check the state of services on the left panel, follow the screenshot:

3. Enter the location for Middle Ware Home and click “Next”
4. Register for Security Updates if you wish to and click “Next”
5. Choose Install Type, I’ve chosen “Custom” and click “Next”
6. Choose “Products and Components” you wish to use and click “Next”
7. If you have previous JDK/JRockit SDK, you can choose to browse the path, although Oracle recommends that you download the latest JRockit SDK to use with WebLogic. You can download the latest JRockit from:http://www.oracle.com/technology/products/jrockit/index.html
This screen displays a list of JDKs. This list differs depending on the specific installer you are using. For example, .jar installers do not include SDKs. If you are upgrading from a previous version, the list contains JDKs that are available for (and common across) previous installations of all the selected WebLogic Server components.
Select the JDK or JDKs that you want to install with the product.
You can also browse for and select a local JDK (at least 1.6.0_05) installed on your machine.
This screen also displays the approximate installed size of the highlighted JDK, the total installed size of all the selected JDKs, and the total installed size of all the components.
8. Choose “Product Installation Directories” and click “Next”
9. Choose whether you want to install the Windows services indicated, specifically the Oracle WebLogic Server Node Manager service. Node Manager is used to monitor, start, and stop server instances in a WebLogic domain.
If you select Yes, enter the Node Manager Listen Port in the appropriate field. The default is 5556.
All Users Start menu folder
Select this option to provide all users registered on the machine with access to the installed software. However, only users with administrator privileges can create shortcuts in the All Users folder. Therefore, if a user without administrator privileges uses the Configuration Wizard to create WebLogic domains, Start menu shortcuts to the domains are not created. In this case, users can manually create shortcuts in their local Start menu folders, if desired. Press ALT+A on the keyboard to select the All Users Start Menu.
Local User's Start menu folder
Selecting this option ensures that other users registered on this machine do not have access to the Start menu entries for this installation. Press ALT+L on the keyboard to select the Local User's start menu.
11. Review the Installation Summary and click “Next”
Configuration
1. Now in the configuration wizard, we’ll choose “Create New WebLogic Domain” and click “Next”
2. Choose the defaults, I’ve also chosen “WebLogic Advanced Web Services Extension” from the following screen, click “Next” to proceed
Now enter the Domain Name and Enter the Domain Location, click “Next” to proceed
Configure the WebLogic Administrator and Password, click “Next” to proceed
5. As this is a basic install and for development purposes, I will choose the “Domain Startup Mode” as “Development. Careful consideration should be taken for production deployment. Click “Next” to proceed
6. Select the Optional Configuration , I’ve selected the following options(we can configure JMS at a later stage):
Configure the Admin Server :
8. Configure the Managed servers and click “Next”
9. Next screen asks you if you wish to configure cluster, I did not configure any cluster. Click “Next” to proceed.
10. Next Screen is Configure Machines, I’ve not configured any. Click ” Next” to proceed
11. Review the Configuration Summary and click “Create”
12. Start the Admin server Click “Done” to finish and close the quickstart screen.
13. Now that we have installed and configured the WebLogic server, lets start the WebLogic server for the domain we configured. If Admin server is not started during the installation ,the startup scripts are placed in the user_projects directory for the domain we configured.
D:\oracle\product\weblogic12c\user_projects\domains\base_domain
Startweblogic.cmd
14. Now that the WebLogic Server is started lets login to the console
1. In to order login to the console open the web browser , the URL will be of the following format:
http://
In my case it will be
http://ashraf-oracle:7004/console/
The user name is “weblogic” and the password is what you configured during the configuration.
You will be presented with a neat front page, navigate to check the state of services on the left panel, follow the screenshot:
Friday, December 9, 2011
net share


NET SHARE commandNET SHARE is used to manage shared resources. NET SHARE creates, deletes, modifies, or displays shared resources. This command is used to make a resource available to clients.
This command needs to be run as root or an account that has the proper privileges to share resources, so to avoid any complications, it is best to use the Administrator account.
How to quickly view all shared folder on my computer?
You can use the NET SHARE command without parameters to get this information. When using the NET SHARE command without parameters, NET SHARE displays information about all of the resources that are shared on the local computer.
Go to the Start menu, click Run, type cmd, and hit ENTER. Then type NET SHARE, and you will get a screen similar to the following:
Executing the NET SHARE command without parameters gives you a listing of all the folders that are shared on your computer.
Shared resource names that end in a $ character do not appear when you browse the local computer from a remote computer. If you want to access this folder from the remote computer, you have to type an exact path into your Explorer on the computer from which you connect to the shared folder.
How do I get detailed information about a shared local folder?
If you need detailed information about a particular shared folder, execute the NET SHARE folder with the name of the shared device, for example NET SHARE C$. You will get an output of the NET SHARE command similar to the following:
These parameters, such as the maximum number of users who can simultaneously access the shared resource, can be modified by the NET SHARE command too. See the explanation of parameters for the NET SHARE command below.
How do I share a folder?
To create a new local file share, use the following NET SHARE command:
NET SHARE sharename=drive:path /REMARK:"My shared folder" [/CACHE:Manual Automatic No ]
This is what it would look like in the real world:
NET SHARE MySharedFolder=c:\Documents /REMARK:"Docs on server XYZ"
Eg:
By executing this command, you would make the Documents folder on the C drive available for others in the network.
How do I limit how many users can access my shared folder?
To limit the number of users who can connect to a shared folder, you would use the following NET SHARE command:
NET SHARE sharename /USERS:number /REMARK:"Shared folder with limited number of users"
To remove any limit on the number of users who can connect to a shared folder, use the following:
NET SHARE sharename /UNLIMITED /REMARK:"Folder with unlimited access"
This will allow unlimited number of users to connect to the shared resource.
How do I remove sharing from a folder?
You can accomplish this using the following NET SHARE command again. If you want to delete a share, then execute the following:
NET SHARE {sharename devicename drive:path} /DELETE
To delete all shares that apply to a given device, you would use the following:
NET SHARE devicename /DELETE
Eg:
In this case the devicename can be a printer (Lpt1) or a pathname (for example C:\MySharedFolder\).
Possible problems with NET SHARE syntax
In case your folder or server name contains a space, you need to enclose the drive and the path of the directory in quotation marks (for example, "C:\MySharedFolder"). Not providing quotation marks results in an error message: System error 85 has occurred.
System errors related to NET SHARE
When using the NET SHARE command, you can run into some syntax-related errors. The System error 67 occurred is a very common one. See here for more details: System error 67 has occurred.
Are there other related useful networking commands?
The NET SHARE command is used at the server to share a folder to others. If you want to access this shared resource from a client, you would use the NET USE command.
This page provides an overview of all available networking server commands: server NET commands.
NET SHARE syntax
net share [ShareName]
net share [ShareName=Drive:Path
[{/users:Number /unlimited}]
[/remark:"Text"]
[/cache: {manual automatic no}]
]
net share [ShareName
[{/users:Number unlimited}]
[/remark:"Text"]
[/cache: {manual automatic no}]
]
net share [{ShareName Drive:Path} /delete]
What are the parameters?
ShareName
Specifies the name of the shared resource as it should display on the network.
Drive:Path
Defines the absolute path of the directory to be shared.
/remark:"Text"
Adds a description about the resource. Do not forget to enclose it in quotation marks.
/users:Number
Used to set the maximum number of users who can simultaneously access the shared resource.
/unlimited
This setting specifies an unlimited number of users who can simultaneously access the shared resource.
/cache:manual
Enables offline client caching with manual reintegration.
/cache:automatic
Enables offline client caching with automatic reintegration.
/cache:documents
Enables automatic caching of documents from this share.
/cache:programs
Enables automatic caching of documents and programs.
/cache:no
Disables caching.
/delete
Stops sharing the shared resource.
net helpCommand
Displays Help for the specified net command.
Sunday, December 4, 2011
WebLogic 12c
On December 1 ORACLE , unveils the next generation of the industry’s #1 application server and cornerstone of Oracle’s cloud application foundation—Oracle WebLogic Server 12c.
The WebLogic 12c release comes as the Java 7 language specification begins to take hold and as cloud deployments continues to rise.
"The Cloud application foundation is the underlying application infrastructure for all of our Fusion middleware, and WebLogic12c is the cornerstone of that infrastructure,"
One of the biggest new features in WebLogic 12c is full support for JavaEE 6.Oracle has been adding some JavaEE 6 APIs to minor WebLogic 11g updates to provide some incremental features.
"12c has the full complement of JavaEE 6, including RESTful Web Services, lightweight Web Services with EJB and the most desired feature which is context and dependency injection," .
Lehmann noted that customers have been waiting for JavaEE 6, since it significantly reduces the amount of code and Java classes that previously necessitated the use of third party frameworks. He added that WebLogic customers can leverage JavaEE 6 now as a lightweight development framework and programming model.
Support is also included for Java SE 7, which was officially launched in July. Java SE 7 provides better mutli-core processor support with the fork/join framework, and it includes improvements to the Java Virtual Machine (JVM) for multi-language support.
The focus on developers and efficiency is also reflected in the size of the WebLogic 12c server itself. Lehmann said that the developer download size for WebLogic 12c is only 168 MB, which is a sixfold size decrease compared to the previous release.
From a scalability perspective, Oracle is baking in a higher level of abstraction for cloud deployments. Lehmann explained that the Oracle Virtual Assembly Builder component gathers up multiple virtual machines into a unit known as an "assembly." He added that when virtual machines are treated as a unit it provides the abstraction necessary to properly manage a cloud deployment.
The Oracle Traffic Director component expands on the delivery capabilities that previous generations of WebLogic have included. Lehmann noted that in the WebLogic 11g release, Oracle bundled in the Coherence caching server. With the new WebLogic 12c release, there is a new software load balancer called the Oracle Traffic Director.
"What we've done with the Oracle Traffic Director is we've put a software load balancer for traffic routing, shaping and capacity management on the Exalogic system for the WebLogic server," Lehmann said. "When a WebLogic 12c deployment grows or shrinks, the system automatically adjusts the network traffic for the environment to gracefully bring on or reduce load."
The Exalogic Elastic Cloud is an engineered system from Oracle that debuted at the end of 2010. The Exalogic is purpose-built engineered system for Java and Oracle middleware applications. Lehmann stressed that while WebLogic 12c is highly optimized when running on Exalogic, it will also run across other x86 systems.
"As you move from conventional systems to an engineered system like Exalogic we do further performance optimizations and integration," Lehmann said. "For a conventional server this is a standard web tier that is included with WebLogic, when you go to Exalogic you get Oracle Traffic Director."
The WebLogic 12c release is also the first WebLogic release since Oracle acquired Sun, which has its own Java middleware server with the open source GlassFish project that Oracle still supports and develops. Lehmann explained that applications on GlassFish can be easily redeployed to WebLogic 12c, to get the benefit of additional enterprise and cloud scale features. Those additional features include support for Oracle RAC (Real Application Clusters), virtualization support, Oracle Traffic Director and the Coherence integration among other capabilities.
"GlassFish is a fantastic development environment and now with WebLogic 12c and its support for JavaEE 6 and Java SE 7, WebLogic is also a great development environment," Lehmann said. "Another point of differentiation is that Fusion middleware and applications are certified on WebLogic; they are not certified or support on GlassFish."
GlassFish is all about helping to drive the JavaEE specification forward, although it is also its own product that has Oracle commercial support.
"Generally for more robust and higher-end deployment, people will generally look to WebLogic," Lehmann said.
The WebLogic 12c release comes as the Java 7 language specification begins to take hold and as cloud deployments continues to rise.
"The Cloud application foundation is the underlying application infrastructure for all of our Fusion middleware, and WebLogic12c is the cornerstone of that infrastructure,"
One of the biggest new features in WebLogic 12c is full support for JavaEE 6.Oracle has been adding some JavaEE 6 APIs to minor WebLogic 11g updates to provide some incremental features.
"12c has the full complement of JavaEE 6, including RESTful Web Services, lightweight Web Services with EJB and the most desired feature which is context and dependency injection," .
Lehmann noted that customers have been waiting for JavaEE 6, since it significantly reduces the amount of code and Java classes that previously necessitated the use of third party frameworks. He added that WebLogic customers can leverage JavaEE 6 now as a lightweight development framework and programming model.
Support is also included for Java SE 7, which was officially launched in July. Java SE 7 provides better mutli-core processor support with the fork/join framework, and it includes improvements to the Java Virtual Machine (JVM) for multi-language support.
The focus on developers and efficiency is also reflected in the size of the WebLogic 12c server itself. Lehmann said that the developer download size for WebLogic 12c is only 168 MB, which is a sixfold size decrease compared to the previous release.
From a scalability perspective, Oracle is baking in a higher level of abstraction for cloud deployments. Lehmann explained that the Oracle Virtual Assembly Builder component gathers up multiple virtual machines into a unit known as an "assembly." He added that when virtual machines are treated as a unit it provides the abstraction necessary to properly manage a cloud deployment.
The Oracle Traffic Director component expands on the delivery capabilities that previous generations of WebLogic have included. Lehmann noted that in the WebLogic 11g release, Oracle bundled in the Coherence caching server. With the new WebLogic 12c release, there is a new software load balancer called the Oracle Traffic Director.
"What we've done with the Oracle Traffic Director is we've put a software load balancer for traffic routing, shaping and capacity management on the Exalogic system for the WebLogic server," Lehmann said. "When a WebLogic 12c deployment grows or shrinks, the system automatically adjusts the network traffic for the environment to gracefully bring on or reduce load."
The Exalogic Elastic Cloud is an engineered system from Oracle that debuted at the end of 2010. The Exalogic is purpose-built engineered system for Java and Oracle middleware applications. Lehmann stressed that while WebLogic 12c is highly optimized when running on Exalogic, it will also run across other x86 systems.
"As you move from conventional systems to an engineered system like Exalogic we do further performance optimizations and integration," Lehmann said. "For a conventional server this is a standard web tier that is included with WebLogic, when you go to Exalogic you get Oracle Traffic Director."
The WebLogic 12c release is also the first WebLogic release since Oracle acquired Sun, which has its own Java middleware server with the open source GlassFish project that Oracle still supports and develops. Lehmann explained that applications on GlassFish can be easily redeployed to WebLogic 12c, to get the benefit of additional enterprise and cloud scale features. Those additional features include support for Oracle RAC (Real Application Clusters), virtualization support, Oracle Traffic Director and the Coherence integration among other capabilities.
"GlassFish is a fantastic development environment and now with WebLogic 12c and its support for JavaEE 6 and Java SE 7, WebLogic is also a great development environment," Lehmann said. "Another point of differentiation is that Fusion middleware and applications are certified on WebLogic; they are not certified or support on GlassFish."
GlassFish is all about helping to drive the JavaEE specification forward, although it is also its own product that has Oracle commercial support.
"Generally for more robust and higher-end deployment, people will generally look to WebLogic," Lehmann said.
Monday, November 28, 2011
OS block size for Linux and Windows
Determine OS block size for Linux and Windows
A block is a uniformly sized unit of data storage for a filesystem. Block size can be an important consideration when setting up a system that is designed for maximum performance.
Block size in Linux : If we want to confirm the block size of any filesystem of Ubuntu or any other Linux OS, tune2fs command is here to help:
ubuntu# tune2fs -l /dev/sda1 | grep Block
Block count: 4980736
Block size: 4096
Blocks per group: 32768
From this example, we can see that the default block size for the filesystem on /dev/sda1 partition is 4096 bytes, or 4k. That's the default block size for ext3 filesystem.
OS block size in Solaris :
$perl -e '$a=(stat ".")[11]; print $a'
8192
or
$df -g | grep 'block size'
Block size in Window Machine : If OS is using ntfs system use the below command :
C:\>fsutil fsinfo ntfsinfo D:
NTFS Volume Serial Number : 0x7a141d52141d12ad
Version : 3.1
Number Sectors : 0x00000000036b17d0
Total Clusters : 0x00000000006d62fa
Free Clusters : 0x00000000001ed190
Total Reserved : 0x0000000000000170
Bytes Per Sector : 512
Bytes Per Cluster : 4096 <<=== (block size)
Bytes Per FileRecord Segment : 1024
Clusters Per FileRecord Segment : 0
Mft Valid Data Length : 0x0000000005b64000
Mft Start Lcn : 0x00000000000c0000
Mft2 Start Lcn : 0x000000000036b17d
Mft Zone Start : 0x000000000043c9c0
Mft Zone End : 0x000000000044b460
A block is a uniformly sized unit of data storage for a filesystem. Block size can be an important consideration when setting up a system that is designed for maximum performance.
Block size in Linux : If we want to confirm the block size of any filesystem of Ubuntu or any other Linux OS, tune2fs command is here to help:
ubuntu# tune2fs -l /dev/sda1 | grep Block
Block count: 4980736
Block size: 4096
Blocks per group: 32768
From this example, we can see that the default block size for the filesystem on /dev/sda1 partition is 4096 bytes, or 4k. That's the default block size for ext3 filesystem.
OS block size in Solaris :
$perl -e '$a=(stat ".")[11]; print $a'
8192
or
$df -g | grep 'block size'
Block size in Window Machine : If OS is using ntfs system use the below command :
C:\>fsutil fsinfo ntfsinfo D:
NTFS Volume Serial Number : 0x7a141d52141d12ad
Version : 3.1
Number Sectors : 0x00000000036b17d0
Total Clusters : 0x00000000006d62fa
Free Clusters : 0x00000000001ed190
Total Reserved : 0x0000000000000170
Bytes Per Sector : 512
Bytes Per Cluster : 4096 <<=== (block size)
Bytes Per FileRecord Segment : 1024
Clusters Per FileRecord Segment : 0
Mft Valid Data Length : 0x0000000005b64000
Mft Start Lcn : 0x00000000000c0000
Mft2 Start Lcn : 0x000000000036b17d
Mft Zone Start : 0x000000000043c9c0
Mft Zone End : 0x000000000044b460
Tuesday, November 22, 2011
nslookup
Nslookup.exe is a command-line administrative tool for testing and troubleshooting DNS servers. This tool is installed along with the TCP/IP protocol through Control Panel. This article includes several tips for using Nslookup.exe.
MORE INFORMATIONTo use Nslookup.exe, please note the following: The TCP/IP protocol must be inst...To use Nslookup.exe, please note the following:
•The TCP/IP protocol must be installed on the computer running Nslookup.exe
•At least one DNS server must be specified when you run the IPCONFIG /ALL command from a command prompt.
•Nslookup will always devolve the name from the current context. If you fail to fully qualify a name query (that is, use trailing dot), the query will be appended to the current context. For example, the current DNS settings are att.com and a query is performed on www.microsoft.com; the first query will go out as www.microsoft.com.att.com because of the query being unqualified. This behavior may be inconsistent with other vendor's versions of Nslookup, and this article is presented to clarify the behavior of Microsoft Windows NT Nslookup.exe
•If you have implemented the use of the search list in the Domain Suffix Search Order defined on the DNS tab of the Microsoft TCP/IP Properties page, devolution will not occur. The query will be appended to the domain suffixes specified in the list. To avoid using the search list, always use a Fully Qualified Domain Name (that is, add the trailing dot to the name).
Nslookup.exe can be run in two modes: interactive and noninteractive. Noninteractive mode is useful when only a single piece of data needs to be returned. The syntax for noninteractive mode is:
nslookup [-option] [hostname] [server]
To start Nslookup.exe in interactive mode, simply type "nslookup" at the command prompt:
C:\> nslookup
Default Server: nameserver1.domain.com
Address: 10.0.0.1
>
Typing "help" or "?" at the command prompt will generate a list of available commands. Anything typed at the command prompt that is not recognized as a valid command is assumed to be a host name and an attempt is made to resolve it using the default server. To interrupt interactive commands, press CTRL+C. To exit interactive mode and return to the command prompt, type exit at the command prompt.
The following is the help output and contains the complete list of options:
Commands: (identifiers are shown in uppercase, [] means optional)
NAME - print info about the host/domain NAME using default
server
NAME1 NAME2 - as above, but use NAME2 as server
help or ? - print info on common commands
set OPTION - set an option
all - print options, current server and host
[no]debug - print debugging information
[no]d2 - print exhaustive debugging information
[no]defname - append domain name to each query
[no]recurse - ask for recursive answer to query
[no]search - use domain search list
[no]vc - always use a virtual circuit
domain=NAME - set default domain name to NAME
srchlist=N1[/N2/.../N6] - set domain to N1 and search list to N1, N2,
and so on
root=NAME - set root server to NAME
retry=X - set number of retries to X
timeout=X - set initial time-out interval to X seconds
type=X - set query type (for example, A, ANY, CNAME, MX,
NS, PTR, SOA, SRV)
querytype=X - same as type
class=X - set query class (for example, IN (Internet), ANY)
[no]msxfr - use MS fast zone transfer
ixfrver=X - current version to use in IXFR transfer request
server NAME - set default server to NAME, using current default server
lserver NAME - set default server to NAME, using initial server
finger [USER] - finger the optional NAME at the current default host
root - set current default server to the root
ls [opt] DOMAIN [> FILE] - list addresses in DOMAIN (optional: output to
FILE)
-a - list canonical names and aliases
-d - list all records
-t TYPE - list records of the given type (for example, A, CNAME,
MX, NS, PTR, and so on)
view FILE - sort an 'ls' output file and view it with pg
exit - exit the program
A number of different options can be set in Nslookup.exe by running the set command at the command prompt. A complete listing of these options is obtained by typing set all. See above, under the set command for a printout of the available options.
Looking up Different Data Types
To look up different data types within the domain name space, use the set type or set q[uerytype] command at the command prompt. For example, to query for the mail exchanger data, type the following:
C:\> nslookup
Default Server: ns1.domain.com
Address: 10.0.0.1
> set q=mx
> mailhost
Server: ns1.domain.com
Address: 10.0.0.1
mailhost.domain.com MX preference = 0, mail exchanger =
mailhost.domain.com
mailhost.domain.com internet address = 10.0.0.5
>
The first time a query is made for a remote name, the answer is authoritative, but subsequent queries are nonauthoritative. The first time a remote host is queried, the local DNS server contacts the DNS server that is authoritative for that domain. The local DNS server will then cache that information, so that subsequent queries are answered nonauthoritatively out of the local server's cache.
Querying Directly from Another Name Server
To query another name server directly, use the server or lserver commands to switch to that name server. The lserver command uses the local server to get the address of the server to switch to, while the server command uses the current default server to get the address.
Example:
C:\> nslookup
Default Server: nameserver1.domain.com
Address: 10.0.0.1
> server 10.0.0.2
Default Server: nameserver2.domain.com
Address: 10.0.0.2
>
Using Nslookup.exe to Transfer Entire Zone
Nslookup can be used to transfer an entire zone by using the ls command. This is useful to see all the hosts within a remote domain. The syntax for the ls command is:
ls [- a | d | t type] domain [> filename]
Using ls with no arguments will return a list of all address and name server data. The -a switch will return alias and canonical names, -d will return all data, and -t will filter by type.
Example:
>ls domain.com
[nameserver1.domain.com]
nameserver1.domain.com. NS server = ns1.domain.com
nameserver2.domain.com NS server = ns2.domain.com
nameserver1 A 10.0.0.1
nameserver2 A 10.0.0.2
>
Zone transfers can be blocked at the DNS server so that only authorized addresses or networks can perform this function. The following error will be returned if zone security has been set:
*** Can't list domain example.com.: Query refused
For additional information, see the following article or articles in the Microsoft Knowledge Base:
193837 (http://support.microsoft.com/kb/193837/EN-US/ ) Windows NT 4.0 DNS Server Default Zone Security Settings
Back to the top
Troubleshooting Nslookup.exe
Default Server Timed Out
When starting the Nslookup.exe utility, the following errors may occur:
*** Can't find server name for address w.x.y.z: Timed out
NOTE: w.x.y.z is the first DNS server listed in the DNS Service Search Order list.
*** Can't find server name for address 127.0.0.1: Timed out
The first error indicates that the DNS server cannot be reached or the service is not running on that computer. To correct this problem, either start the DNS service on that server or check for possible connectivity problems.
The second error indicates that no servers have been defined in the DNS Service Search Order list. To correct this problem, add the IP address of a valid DNS server to this list.
For additional information, see the following article or articles in the Microsoft Knowledge Base:
172060 (http://support.microsoft.com/kb/172060/EN-US/ ) NSLOOKUP: Can't Find Server Name for Address 127.0.0.1
Can't Find Server Name when Starting Nslookup.exe
When starting the Nslookup.exe utility, the following error may occur:
*** Can't find server name for address w.x.y.z: Non-existent domain
This error occurs when there is no PTR record for the name server's IP address. When Nslookup.exe starts, it does a reverse lookup to get the name of the default server. If no PTR data exists, this error message is returned. To correct make sure that a reverse lookup zone exists and contains PTR records for the name servers.
For additional information, see the following article or articles in the Microsoft Knowledge Base:
172953 (http://support.microsoft.com/kb/172953/EN-US/ ) How to Install and Configure Microsoft DNS Server
Nslookup on Child Domain Fails
When querying or doing a zone transfer on a child domain, Nslookup may return the following errors:
*** ns.domain.com can't find child.domain.com.: Non-existent domain *** Can't list domain child.domain.com.: Non-existent domain
In DNS Manager, a new domain can be added under the primary zone, thus creating a child domain. Creating a child domain this way does not create a separate db file for the domain, thus querying that domain or running a zone transfer on it will produce the above errors. Running a zone transfer on the parent domain will list data for both the parent and child domains. To work around this problem, create a new primary zone on the DNS server for the child domain.
MORE INFORMATIONTo use Nslookup.exe, please note the following: The TCP/IP protocol must be inst...To use Nslookup.exe, please note the following:
•The TCP/IP protocol must be installed on the computer running Nslookup.exe
•At least one DNS server must be specified when you run the IPCONFIG /ALL command from a command prompt.
•Nslookup will always devolve the name from the current context. If you fail to fully qualify a name query (that is, use trailing dot), the query will be appended to the current context. For example, the current DNS settings are att.com and a query is performed on www.microsoft.com; the first query will go out as www.microsoft.com.att.com because of the query being unqualified. This behavior may be inconsistent with other vendor's versions of Nslookup, and this article is presented to clarify the behavior of Microsoft Windows NT Nslookup.exe
•If you have implemented the use of the search list in the Domain Suffix Search Order defined on the DNS tab of the Microsoft TCP/IP Properties page, devolution will not occur. The query will be appended to the domain suffixes specified in the list. To avoid using the search list, always use a Fully Qualified Domain Name (that is, add the trailing dot to the name).
Nslookup.exe can be run in two modes: interactive and noninteractive. Noninteractive mode is useful when only a single piece of data needs to be returned. The syntax for noninteractive mode is:
nslookup [-option] [hostname] [server]
To start Nslookup.exe in interactive mode, simply type "nslookup" at the command prompt:
C:\> nslookup
Default Server: nameserver1.domain.com
Address: 10.0.0.1
>
Typing "help" or "?" at the command prompt will generate a list of available commands. Anything typed at the command prompt that is not recognized as a valid command is assumed to be a host name and an attempt is made to resolve it using the default server. To interrupt interactive commands, press CTRL+C. To exit interactive mode and return to the command prompt, type exit at the command prompt.
The following is the help output and contains the complete list of options:
Commands: (identifiers are shown in uppercase, [] means optional)
NAME - print info about the host/domain NAME using default
server
NAME1 NAME2 - as above, but use NAME2 as server
help or ? - print info on common commands
set OPTION - set an option
all - print options, current server and host
[no]debug - print debugging information
[no]d2 - print exhaustive debugging information
[no]defname - append domain name to each query
[no]recurse - ask for recursive answer to query
[no]search - use domain search list
[no]vc - always use a virtual circuit
domain=NAME - set default domain name to NAME
srchlist=N1[/N2/.../N6] - set domain to N1 and search list to N1, N2,
and so on
root=NAME - set root server to NAME
retry=X - set number of retries to X
timeout=X - set initial time-out interval to X seconds
type=X - set query type (for example, A, ANY, CNAME, MX,
NS, PTR, SOA, SRV)
querytype=X - same as type
class=X - set query class (for example, IN (Internet), ANY)
[no]msxfr - use MS fast zone transfer
ixfrver=X - current version to use in IXFR transfer request
server NAME - set default server to NAME, using current default server
lserver NAME - set default server to NAME, using initial server
finger [USER] - finger the optional NAME at the current default host
root - set current default server to the root
ls [opt] DOMAIN [> FILE] - list addresses in DOMAIN (optional: output to
FILE)
-a - list canonical names and aliases
-d - list all records
-t TYPE - list records of the given type (for example, A, CNAME,
MX, NS, PTR, and so on)
view FILE - sort an 'ls' output file and view it with pg
exit - exit the program
A number of different options can be set in Nslookup.exe by running the set command at the command prompt. A complete listing of these options is obtained by typing set all. See above, under the set command for a printout of the available options.
Looking up Different Data Types
To look up different data types within the domain name space, use the set type or set q[uerytype] command at the command prompt. For example, to query for the mail exchanger data, type the following:
C:\> nslookup
Default Server: ns1.domain.com
Address: 10.0.0.1
> set q=mx
> mailhost
Server: ns1.domain.com
Address: 10.0.0.1
mailhost.domain.com MX preference = 0, mail exchanger =
mailhost.domain.com
mailhost.domain.com internet address = 10.0.0.5
>
The first time a query is made for a remote name, the answer is authoritative, but subsequent queries are nonauthoritative. The first time a remote host is queried, the local DNS server contacts the DNS server that is authoritative for that domain. The local DNS server will then cache that information, so that subsequent queries are answered nonauthoritatively out of the local server's cache.
Querying Directly from Another Name Server
To query another name server directly, use the server or lserver commands to switch to that name server. The lserver command uses the local server to get the address of the server to switch to, while the server command uses the current default server to get the address.
Example:
C:\> nslookup
Default Server: nameserver1.domain.com
Address: 10.0.0.1
> server 10.0.0.2
Default Server: nameserver2.domain.com
Address: 10.0.0.2
>
Using Nslookup.exe to Transfer Entire Zone
Nslookup can be used to transfer an entire zone by using the ls command. This is useful to see all the hosts within a remote domain. The syntax for the ls command is:
ls [- a | d | t type] domain [> filename]
Using ls with no arguments will return a list of all address and name server data. The -a switch will return alias and canonical names, -d will return all data, and -t will filter by type.
Example:
>ls domain.com
[nameserver1.domain.com]
nameserver1.domain.com. NS server = ns1.domain.com
nameserver2.domain.com NS server = ns2.domain.com
nameserver1 A 10.0.0.1
nameserver2 A 10.0.0.2
>
Zone transfers can be blocked at the DNS server so that only authorized addresses or networks can perform this function. The following error will be returned if zone security has been set:
*** Can't list domain example.com.: Query refused
For additional information, see the following article or articles in the Microsoft Knowledge Base:
193837 (http://support.microsoft.com/kb/193837/EN-US/ ) Windows NT 4.0 DNS Server Default Zone Security Settings
Back to the top
Troubleshooting Nslookup.exe
Default Server Timed Out
When starting the Nslookup.exe utility, the following errors may occur:
*** Can't find server name for address w.x.y.z: Timed out
NOTE: w.x.y.z is the first DNS server listed in the DNS Service Search Order list.
*** Can't find server name for address 127.0.0.1: Timed out
The first error indicates that the DNS server cannot be reached or the service is not running on that computer. To correct this problem, either start the DNS service on that server or check for possible connectivity problems.
The second error indicates that no servers have been defined in the DNS Service Search Order list. To correct this problem, add the IP address of a valid DNS server to this list.
For additional information, see the following article or articles in the Microsoft Knowledge Base:
172060 (http://support.microsoft.com/kb/172060/EN-US/ ) NSLOOKUP: Can't Find Server Name for Address 127.0.0.1
Can't Find Server Name when Starting Nslookup.exe
When starting the Nslookup.exe utility, the following error may occur:
*** Can't find server name for address w.x.y.z: Non-existent domain
This error occurs when there is no PTR record for the name server's IP address. When Nslookup.exe starts, it does a reverse lookup to get the name of the default server. If no PTR data exists, this error message is returned. To correct make sure that a reverse lookup zone exists and contains PTR records for the name servers.
For additional information, see the following article or articles in the Microsoft Knowledge Base:
172953 (http://support.microsoft.com/kb/172953/EN-US/ ) How to Install and Configure Microsoft DNS Server
Nslookup on Child Domain Fails
When querying or doing a zone transfer on a child domain, Nslookup may return the following errors:
*** ns.domain.com can't find child.domain.com.: Non-existent domain *** Can't list domain child.domain.com.: Non-existent domain
In DNS Manager, a new domain can be added under the primary zone, thus creating a child domain. Creating a child domain this way does not create a separate db file for the domain, thus querying that domain or running a zone transfer on it will produce the above errors. Running a zone transfer on the parent domain will list data for both the parent and child domains. To work around this problem, create a new primary zone on the DNS server for the child domain.
Friday, November 18, 2011
Boot sequence summary
You may find that your server isn't actually booting to runlevel 3, maybe it's going to 5 (with graphical login)? who -r or runlevel should tell you the current runlevel, and grep initdefault /etc/inittab the boot-time default.
Boot sequence summary
1BIOS
2Master Boot Record (MBR)
3Kernel
4init
--------------------------------------------------------------------------------
BIOS
Load boot sector from one of:
•Floppy
•CDROM
•SCSI drive
•IDE drive
--------------------------------------------------------------------------------
Master Boot Record
•MBR (loaded from /dev/hda or /dev/sda) contains:
◦lilo
■load kernel (image=), or
■load partition boot sector (other=)
◦DOS
■load "bootable" partition boot sector (set with fdisk)
•partition boot sector (eg /dev/hda2) contains:
◦DOS
■loadlin
◦lilo
■kernel
--------------------------------------------------------------------------------
LILO
One minute guide to installing a new kernel
•edit /etc/lilo.conf
◦duplicate image= section, eg:
image=/bzImage-2.2.12
label=12
read-only
◦man lilo.conf for details
•run /sbin/lilo
•(copy modules)
•reboot to test
--------------------------------------------------------------------------------
Kernel
•initialise devices
•(optionally loads initrd, see below)
•mount root FS
◦specified by lilo or loadin
◦kernel prints:
■VFS: Mounted root (ext2 filesystem) readonly.
•run /sbin/init, PID 1
◦can be changed with boot=
◦init prints:
■INIT: version 2.76 booting
--------------------------------------------------------------------------------
initrd
Allows setup to be performed before root FS is mounted
•lilo or loadlin loads ram disk image
•kernel runs /linuxrc
◦load modules
◦initialise devices
◦/linuxrc exits
•"real" root is mounted
•kernel runs /sbin/init
Details in /usr/src/linux/Documentation/initrd.txt
--------------------------------------------------------------------------------
/sbin/init
•reads /etc/inittab
•runs script defined by this line:
◦si::sysinit:/etc/init.d/rcS
•switches to runlevel defined by
◦id:3:initdefault:
--------------------------------------------------------------------------------
sysinit
•debian: /etc/init.d/rcS which runs
◦/etc/rcS.d/S* scripts
■symlinks to /etc/init.d/*
◦/etc/rc.boot/* (depreciated)
•redhat: /etc/rc.d/rc.sysinit script which
◦load modules
◦check root FS and mount RW
◦mount local FS
◦setup network
◦mount remote FS
--------------------------------------------------------------------------------
Example Debian /etc/rcS.d/ directory
README
S05keymaps-lct.sh -> ../init.d/keymaps-lct.sh
S10checkroot.sh -> ../init.d/checkroot.sh
S20modutils -> ../init.d/modutils
S30checkfs.sh -> ../init.d/checkfs.sh
S35devpts.sh -> ../init.d/devpts.sh
S35mountall.sh -> ../init.d/mountall.sh
S35umsdos -> ../init.d/umsdos
S40hostname.sh -> ../init.d/hostname.sh
S40network -> ../init.d/network
S41ipmasq -> ../init.d/ipmasq
S45mountnfs.sh -> ../init.d/mountnfs.sh
S48console-screen.sh -> ../init.d/console-screen.sh
S50hwclock.sh -> ../init.d/hwclock.sh
S55bootmisc.sh -> ../init.d/bootmisc.sh
S55urandom -> ../init.d/urandom
--------------------------------------------------------------------------------
Run Levels
•0 halt
•1 single user
•2-4 user defined
•5 X11
•6 Reboot
•Default in /etc/inittab, eg
◦id:3:initdefault:
•Change using /sbin/telinit
--------------------------------------------------------------------------------
Run Level programs
•Run programs for specified run level
•/etc/inittab lines:
◦1:2345:respawn:/sbin/getty 9600 tty1
■Always running in runlevels 2, 3, 4, or 5
■Displays login on console (tty1)
◦2:234:respawn:/sbin/getty 9600 tty2
■Always running in runlevels 2, 3, or 4
■Displays login on console (tty2)
◦l3:3:wait:/etc/init.d/rc 3
■Run once when switching to runlevel 3.
■Uses scripts stored in /etc/rc3.d/
◦ca:12345:ctrlaltdel:/sbin/shutdown -t1 -a -r now
■Run when control-alt-delete is pressed
--------------------------------------------------------------------------------
Typical /etc/rc3.d/ directory
When changing runlevels /etc/init.d/rc 3:
•Kills K##scripts
•Starts S##scripts
K25nfs-server -< ../init.d/nfs-server
K99xdm -< ../init.d/xdm
S10sysklogd -< ../init.d/sysklogd
S12kerneld -< ../init.d/kerneld
S15netstd_init -< ../init.d/netstd_init
S18netbase -< ../init.d/netbase
S20acct -< ../init.d/acct
S20anacron -< ../init.d/anacron
S20gpm -< ../init.d/gpm
S20postfix -< ../init.d/postfix
S20ppp -< ../init.d/ppp
S20ssh -< ../init.d/ssh
S20xfs -< ../init.d/xfs
S20xfstt -< ../init.d/xfstt
S20xntp3 -< ../init.d/xntp3
S89atd -< ../init.d/atd
S89cron -< ../init.d/cron
S99rmnologin -< ../init.d/rmnologin
--------------------------------------------------------------------------------
Boot Summary
•lilo
◦/etc/lilo.conf
•debian runs
◦/etc/rcS.d/S* and /etc/rc.boot/
◦/etc/rc3.d/S* scripts
•redhat runs
◦/etc/rc.d/rc.sysinit
◦/etc/rc.d/rc3.d/S* scripts
Boot sequence summary
1BIOS
2Master Boot Record (MBR)
3Kernel
4init
--------------------------------------------------------------------------------
BIOS
Load boot sector from one of:
•Floppy
•CDROM
•SCSI drive
•IDE drive
--------------------------------------------------------------------------------
Master Boot Record
•MBR (loaded from /dev/hda or /dev/sda) contains:
◦lilo
■load kernel (image=), or
■load partition boot sector (other=)
◦DOS
■load "bootable" partition boot sector (set with fdisk)
•partition boot sector (eg /dev/hda2) contains:
◦DOS
■loadlin
◦lilo
■kernel
--------------------------------------------------------------------------------
LILO
One minute guide to installing a new kernel
•edit /etc/lilo.conf
◦duplicate image= section, eg:
image=/bzImage-2.2.12
label=12
read-only
◦man lilo.conf for details
•run /sbin/lilo
•(copy modules)
•reboot to test
--------------------------------------------------------------------------------
Kernel
•initialise devices
•(optionally loads initrd, see below)
•mount root FS
◦specified by lilo or loadin
◦kernel prints:
■VFS: Mounted root (ext2 filesystem) readonly.
•run /sbin/init, PID 1
◦can be changed with boot=
◦init prints:
■INIT: version 2.76 booting
--------------------------------------------------------------------------------
initrd
Allows setup to be performed before root FS is mounted
•lilo or loadlin loads ram disk image
•kernel runs /linuxrc
◦load modules
◦initialise devices
◦/linuxrc exits
•"real" root is mounted
•kernel runs /sbin/init
Details in /usr/src/linux/Documentation/initrd.txt
--------------------------------------------------------------------------------
/sbin/init
•reads /etc/inittab
•runs script defined by this line:
◦si::sysinit:/etc/init.d/rcS
•switches to runlevel defined by
◦id:3:initdefault:
--------------------------------------------------------------------------------
sysinit
•debian: /etc/init.d/rcS which runs
◦/etc/rcS.d/S* scripts
■symlinks to /etc/init.d/*
◦/etc/rc.boot/* (depreciated)
•redhat: /etc/rc.d/rc.sysinit script which
◦load modules
◦check root FS and mount RW
◦mount local FS
◦setup network
◦mount remote FS
--------------------------------------------------------------------------------
Example Debian /etc/rcS.d/ directory
README
S05keymaps-lct.sh -> ../init.d/keymaps-lct.sh
S10checkroot.sh -> ../init.d/checkroot.sh
S20modutils -> ../init.d/modutils
S30checkfs.sh -> ../init.d/checkfs.sh
S35devpts.sh -> ../init.d/devpts.sh
S35mountall.sh -> ../init.d/mountall.sh
S35umsdos -> ../init.d/umsdos
S40hostname.sh -> ../init.d/hostname.sh
S40network -> ../init.d/network
S41ipmasq -> ../init.d/ipmasq
S45mountnfs.sh -> ../init.d/mountnfs.sh
S48console-screen.sh -> ../init.d/console-screen.sh
S50hwclock.sh -> ../init.d/hwclock.sh
S55bootmisc.sh -> ../init.d/bootmisc.sh
S55urandom -> ../init.d/urandom
--------------------------------------------------------------------------------
Run Levels
•0 halt
•1 single user
•2-4 user defined
•5 X11
•6 Reboot
•Default in /etc/inittab, eg
◦id:3:initdefault:
•Change using /sbin/telinit
--------------------------------------------------------------------------------
Run Level programs
•Run programs for specified run level
•/etc/inittab lines:
◦1:2345:respawn:/sbin/getty 9600 tty1
■Always running in runlevels 2, 3, 4, or 5
■Displays login on console (tty1)
◦2:234:respawn:/sbin/getty 9600 tty2
■Always running in runlevels 2, 3, or 4
■Displays login on console (tty2)
◦l3:3:wait:/etc/init.d/rc 3
■Run once when switching to runlevel 3.
■Uses scripts stored in /etc/rc3.d/
◦ca:12345:ctrlaltdel:/sbin/shutdown -t1 -a -r now
■Run when control-alt-delete is pressed
--------------------------------------------------------------------------------
Typical /etc/rc3.d/ directory
When changing runlevels /etc/init.d/rc 3:
•Kills K##scripts
•Starts S##scripts
K25nfs-server -< ../init.d/nfs-server
K99xdm -< ../init.d/xdm
S10sysklogd -< ../init.d/sysklogd
S12kerneld -< ../init.d/kerneld
S15netstd_init -< ../init.d/netstd_init
S18netbase -< ../init.d/netbase
S20acct -< ../init.d/acct
S20anacron -< ../init.d/anacron
S20gpm -< ../init.d/gpm
S20postfix -< ../init.d/postfix
S20ppp -< ../init.d/ppp
S20ssh -< ../init.d/ssh
S20xfs -< ../init.d/xfs
S20xfstt -< ../init.d/xfstt
S20xntp3 -< ../init.d/xntp3
S89atd -< ../init.d/atd
S89cron -< ../init.d/cron
S99rmnologin -< ../init.d/rmnologin
--------------------------------------------------------------------------------
Boot Summary
•lilo
◦/etc/lilo.conf
•debian runs
◦/etc/rcS.d/S* and /etc/rc.boot/
◦/etc/rc3.d/S* scripts
•redhat runs
◦/etc/rc.d/rc.sysinit
◦/etc/rc.d/rc3.d/S* scripts
Subscribe to:
Posts (Atom)


